Dockerized Galaxy on the Cloud Quickstart
Currently the GVL images available on NeCTAR are incompatible with Docker; with the release of the GVL version 4 (now in beta), this should no longer be an issue and a default GVL instance should support running Dockerized tools. In the meantime, our custom Galaxy on the Cloud image and bucket can be used, as detailed below.
Requirements:
- Access to NeCTAR Australian Research Cloud (must be a member of an institution subscribing to the Australian Access Federation)
- Available resources to run the desired instance type
Get NeCTAR Credentials
If you already have EC2 Credentials for NeCTAR, you can skip this step.
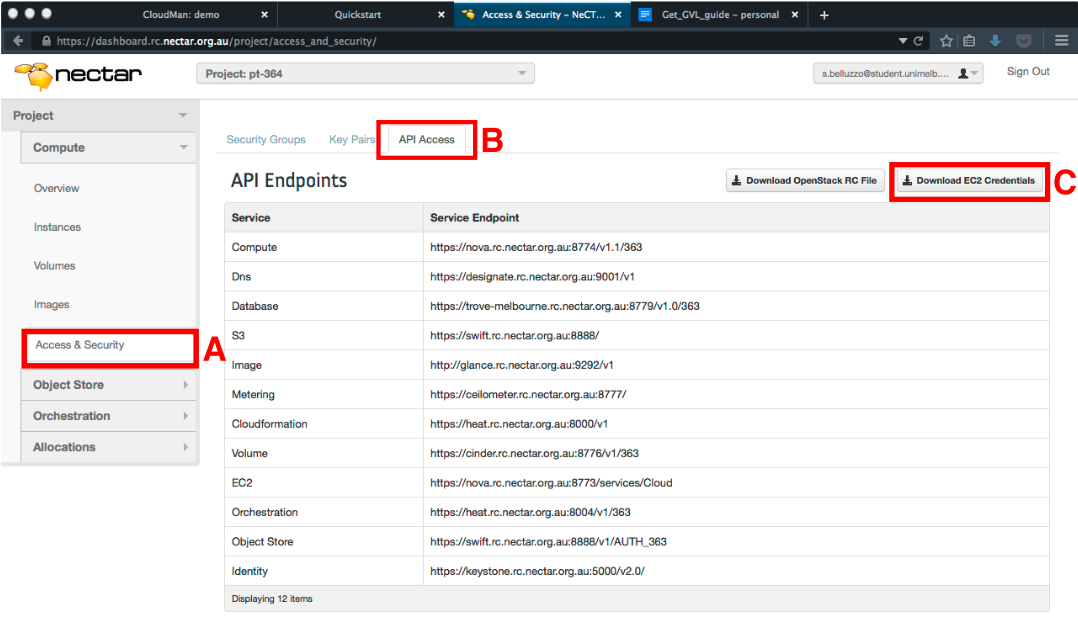
- Log in to the NeCTAR Dashboard. You may need to agree to some Terms and Conditions if it is your first time logging in.
- In the Dashboard, click on “Access & Security” in the left panel (under the “Compute” tab) (Box A in figure below).
- Select the “API Access” tab at the top of the page (Box B in figure below).
- Download the required credentials by clicking the “Download EC2 Credentials” button on the right hand side of the screen (Box C in figure below).
- Unzip the file you just downloaded, and open the “ec2rc.sh” file with a text editor (eg Notepad or Wordpad in Windows, TextEdit in Mac OS X).
- Note the “EC2_ACCESS_KEY” and “EC2_SECRET_KEY” lines, these are the credentials you need to use the web-based GVL Launcher.
Launch the Galaxy-Docker image
- Navigate to the GVL Launcher.
- Fill out the form, using the values detailed below. If not mentioned, the default is fine. You will need to click on “Show advanced options” for the last three fields.
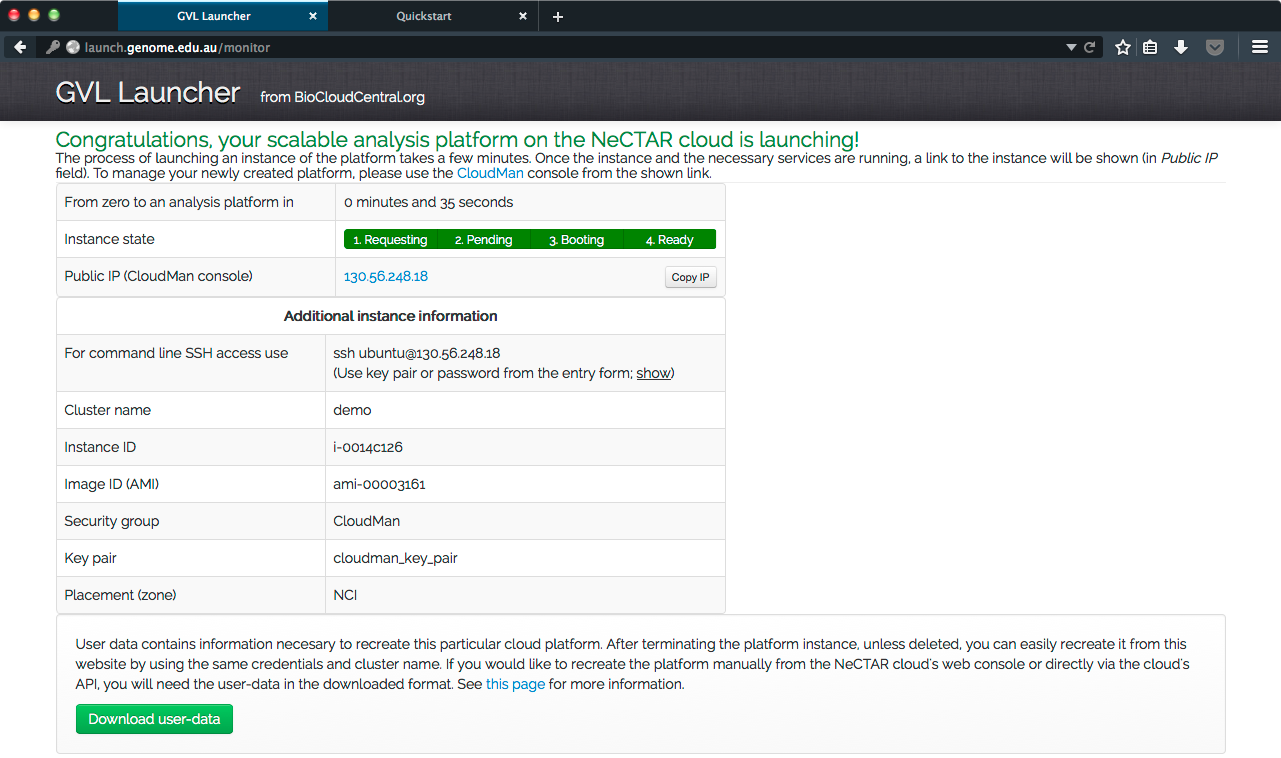
- Click “Start an instance”. Your machine will be started and set up for you, with the progress shown in the GVL Launcher’s monitor. It should take less than 10 minutes.
- Once the machine is running, the screen below will be displayed. The IP address for the instance will be shown, click on it to go to it.
| Field | Content |
|---|---|
| Cloud | NeCTAR (OpenStack) |
| Access Key | EC2_ACCESS_KEY value from the previous step |
| Secret Key | EC2_SECRET_KEY value from the previous step |
| Institutional email | Your institutional email |
| Cluster name | A name for your cluster, can be anything you like |
| Password | A strong password, to allow you access and protect against attacks |
| Instance type | Type of machine to start (small or medium if you are using the default personal tenancy) |
| Extra User-Data | default_bucket_url: https://swift.rc.nectar.org.au:8888/v1/AUTH_ffb00634530a4c37a0b8b08c48068adf/cm-docker |
| Image | Custom image |
| Custom image ID | ami-00003161 |
Start the Galaxy instance
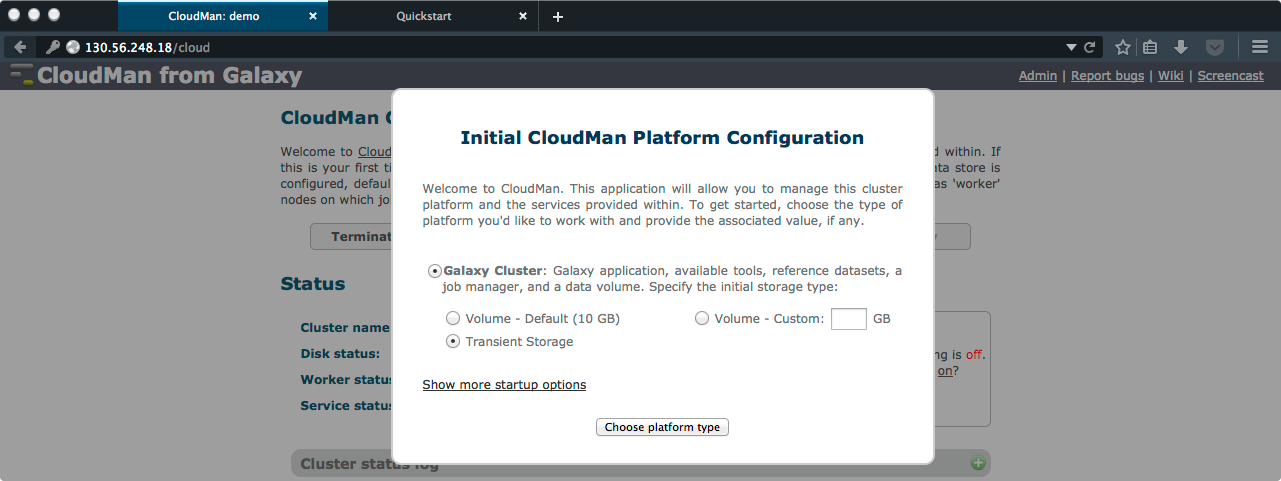
- On the CloudMan “welcome” page, click on the “CloudMan Console” link to go to the Admin page. You will need to log in, with Username being “ubuntu” and Password being the one you entered on the Launch page.
- Select the type of cluster you want. For our purposes, “Galaxy Cluster” and “Transient Storage” is sufficient. After clicking “Choose platform type”, CloudMan will configure a Galaxy instance for you (taking less than 5 minutes).
- Once complete, click “Access Galaxy” to go to your new Galaxy instance, and register.
- To actually be able to install tools and benefit from the presence of Docker, you need to be an admin. This can be done by following the instructions in the Galaxy and CloudMan Admin Manual, prepared by the GVL team.
Install Dockerised tools
To install tools, access the Galaxy Admin Interface by clicking the “Admin” link at the top of most Galaxy pages, and follow the Galaxy Tool Installation Tutorial from step 3.
Our Dockerised proteomics tools are currently in the Test Tool Shed, and are named mascot, msgfplus, omssa, sixframe_translate, tpp_prophets, and xtandem.